
A Bloggers Guide to VAT Accounting | Making VAT Digital for Sole Traders
The blogging industry is relatively new, full of individuals who have never run a business before or even worked as a sole trader. There’s little support & resources when it comes to best practices with invoicing, accountancy, tax etc, so today I’m going to give you a basic guide to VAT accounting. When working for a company, everything is just taken care of. Your NI contributions are taken from your salary, as is Income Tax via PAYE and you just get a payslip at the end of the month which equals the amount you get paid into your bank account…it’s a nice way to live! I’ve been a business owner with Hawkins & Shepherd for over 5 years and a sole trader with my main income coming from blogging and creating social/digital content for about 4 years.
So today I’m talking about VAT accounting. This is simply charging VAT on invoices for work you have completed and claiming VAT back against purchases you have brought. Please Note: this is separate from your self-assessment end-of-year return, which you pay income tax.
Making tax digital for VAT will come into effect from April 2019, so from that date, businesses with a turnover above the VAT threshold (currently £85,000) will have to submit their returns through Making Tax Digital (MTD) software.
Are you VAT registered? Do you need to be VAT registered?
Regardless if you are a Limited Company or a Sole Trader, you have to register for VAT if you or your business turns over £85,000 during a 12 month period. Of course you can register voluntarily even if you do not reach this turnover if it suits you financially.
If you are VAT registered you will need to charge VAT (currently at 20% in the UK) on any sales invoices for work completed. You can also claim back VAT on any purchases that have VAT applied, such as IT Hardware and camera equipment. Please note that you can not claim back tax-exempt items such as postage, bank fees and purchases outside of the EU. Always check your receipts on goods you have brought; if VAT is charged, you can claim it back, if it isn’t you can’t.
As a business owner, you are responsible for keeping track of your income and forecasting when you’ll hit the £85,000 turnover limit. Please note that this is a 12-month rolling calculation and NOT a calendar year or financial year.
As a blogger, I was initially worried about going VAT registered because I was concerned that the brands wouldn’t work with me because my fees would increase by 20%. So for example, if you charge £1,000 for some work as a non-VAT registered business, you’ll of course invoice £1,000. Although now you are VAT registered, you’ll invoice £1,200 (£1,000 plus the 20% VAT). You just need to make the PR’s, brands or agencies know that your quotes are exclusive of VAT and that VAT will be applied to the invoice. You should also double-check any contracts are correct before signing them, as I’ve had one or two contracts that have said the amount is inclusive of VAT, therefore the £1,000 quoted will end up being £800 + £200 VAT. On the flip side most businesses that you are invoicing will already be VAT registered, so they can claim back the VAT on their accounts.
I’ve decided to register for VAT, so what next?
1. Register for VAT.
2. You’ll then receive your VAT registration certificate with your VAT number through the post which you’ll need to submit your VAT returns.
3. Once you have your VAT number, you need to sign-up to use VAT services online.
What accounts software package shall I use?
Well this is entirely up to you, I’ve used Xero for 5 years and have found it easy and intuitive to use. Here are a list of the most commonly used accounts software packages that you can use to make your tax digital.
· Xero - https://www.xero.com/uk/
· Sage - https://uk.sageone.com/accounts/
· Quickbooks - https://quickbooks.intuit.com/uk/
How to setup VAT in Xero Accounts Software
Once you have signed up for VAT and if have chosen Xero, then the below will help you setting up VAT in Xero.
Creating an invoice template with your VAT number

Click on Settings > Organisational Settings > Invoice settings.
Click Options > Edit.
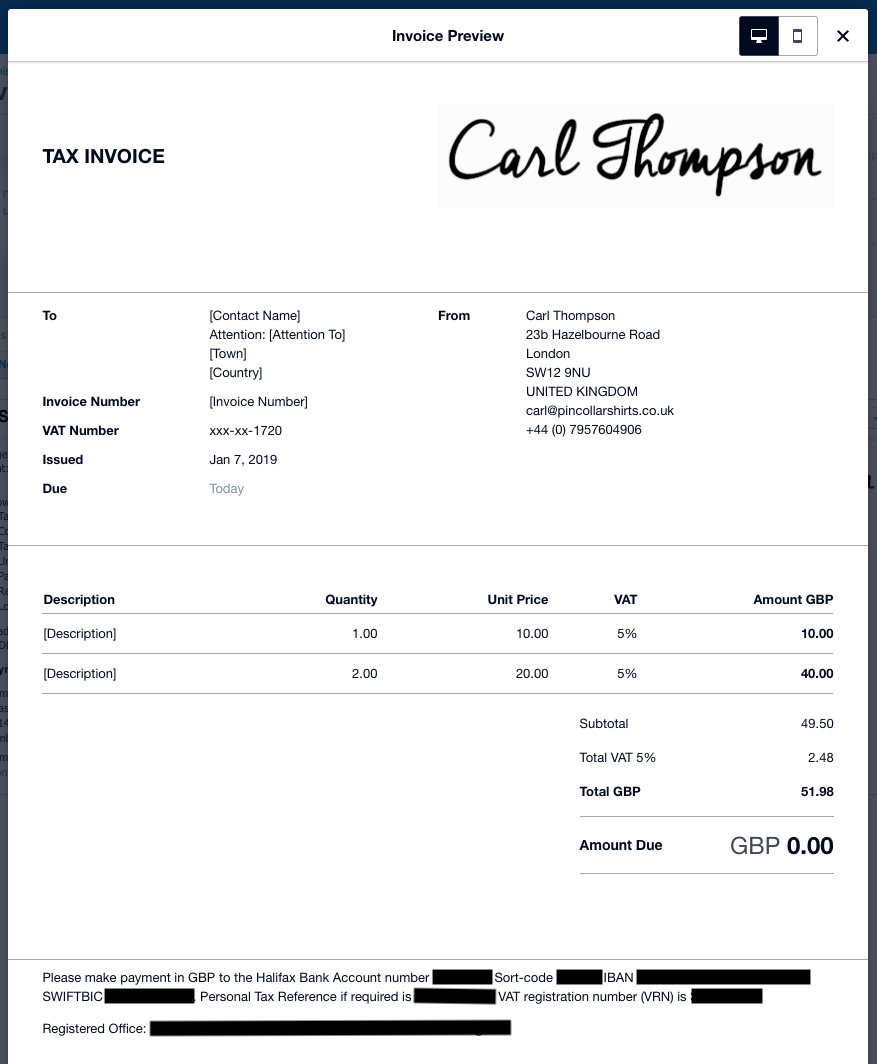
Edit the invoice options as you wish, the below is an example of the invoice template that I created:
Setting up your VAT Scheme and Financial dates
Click on Settings > Organisational Settings > Invoice Settings > Advanced Settings.

Submitting VAT Returns
Make sure you have reconciled all of your bank transactions and sales during the VAT period and then review and submit your return.
You can review your VAT return by using the VAT Reconciliation report. You can submit a VAT return using the VAT Return report.

Founder of this eponymous blog, focusing on men's fashion & lifestyle.